What is CPR?
Cardiopulmonary Resuscitation (CPR) is a lifesaving procedure wherein the chest is pumped with the correct pressure, depth, and timing to help a heart that has stopped beating or is weakened to pump oxygen-rich blood to the entire body including the brain causing the patient to have an extended supply of oxygen thus, increasing the chance of survival until the proper treatment is given.
Who does CPR?
General Public / Bystanders – someone that is close to the situation physically but not a part of an official response team dispatched from emergency services.
Paramedics – a person trained to give emergency medical care to people who are seriously ill with the aim of stabilizing them before they are taken to hospital.
Traditional vs. Simplified CPR
Traditional CPR
Is a repeated combination of compression, opening of the airway, and breathing which is done by; first, 30 chest compressions; followed by opening the patient’s airway using the head-tilt, chin-lift maneuver; then finally, giving 2 rescue breaths (a.k.a Mouth to Mouth Resuscitation).
Mouth-to-mouth resuscitation is done by pinching the nose shut and placing the rescuer’s mouth to the patient’s mouth and blowing air through it twice to make the patient’s chest rise.
Hands-only CPR
Is a simplified method of CPR which is only done by giving pure chest compressions of 100-120 per minute.
How was hands-only CPR created?
Today, the American Heart Association does not push the necessity for rescue breaths on bystander CPR because most collapse cases at home and public are due to cardiac arrest – heart stops beating – which can be treated alone by hands-only CPR because, during cardiac arrest, it is better to prioritize helping the heart to function/pump blood continuously rather than pausing to give 2 rescue breaths (total of 16 sec. for an average person). Moreover, hands-only CPR is easier, less complicated, and has no cross-contamination risk that encourages more bystanders to perform CPR thus, save more lives.
For victims who suffered from lack of oxygen supply, such as near-drowning, drug overdose, or carbon monoxide poisoning, the rescue breath could be done to supply air to their bloodstream and is highly preferred to be administered by trained professionals.
How to tell if a person needs CPR
- Unconscious/lifeless patient who is not breathing or has no pulse
- Electrocution accident victim
Note: Make sure to kill the power source using things that are not electrical conductors (wood/plastic, etc.)
How to Perform Hands-Only CPR
- Immediately call the emergency services once a patient is spotted.
- Clear the area and make sure it is safe to do CPR.
DO NOT PROCEED IF:
- The patient was caught in an accident that might have caused injuries, do not touch or move the patient, let the professionals do this.
- The patient might have inhaled gas or chemicals that might be a hazard to you.
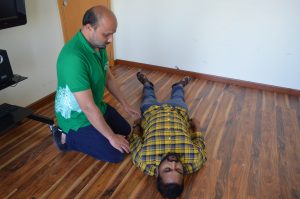
3. Check for breathing or pulse in no more than 10 seconds. To check the breathing, put your ear close to the patient’s mouth or through putting the hand near the chest to feel if the chest rises. For pulse, put your middle and index finger either on the neck of the patient near the ear or the wrist.
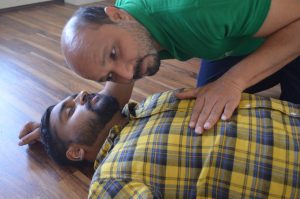
Note: A patient occasionally gasping is NOT considered as breathing.
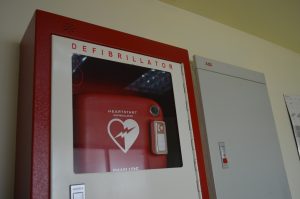
4. If there’s no proper breathing or pulse, ask someone in the area who could help you look for an Automated External Defibrillator (AED), ask them to do so while you administer a CPR.
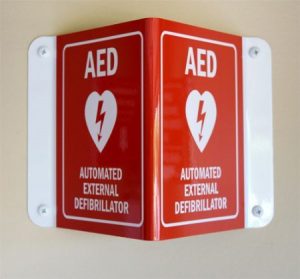
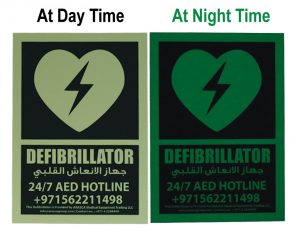
See our AEDs and AED Trainers See our metal and glow-in-the-dark AED Signages
Automated External Defibrillator /AEDs are placed around public areas, such as buildings, parks, etc. to increase the survival rate of victims who suffered from cardiac arrest / with no heartbeat or with abnormal heart rhythm. Signages are also placed near it to make sure bystanders can easily find them.
5. If there is no one to help, proceed with hands-only CPR.
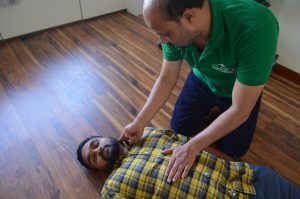
a. Kneel beside the patient’s upper chest.
b. Place the heel of one hand on the center of the chest at the nipple line then put your other hand on top with the fingers bent between the gaps of the hand below it. Keep your elbows straight leaving your shoulders directly over your hands.
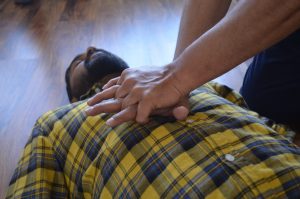
c. Push hard, push fast: Perform a chest compression of 100-120 per minute. Press down at least 2 inches (5cm) for an average adult or child. Let the chest rise completely between every push.
Remember that your hands need to stay in contact with the patient’s chest during compressions. Remember to avoid “leaning” on the victim.
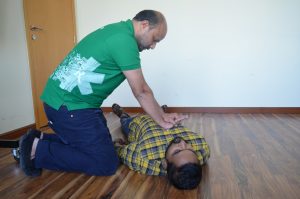
d. Check the patient’s breathing after 100-120 compression and repeat the cycle if there is no progress. If an AED was found, use immediately and follow the prompts.
Stop CPR once:
- AED was successfully administered (if an AED was provided)
- If there is a sign of life or if the patient started breathing
- When emergency help arrives.
If a life is in danger, do not hesitate to perform CPR. Every minute counts for these people. Who knows, you might be someone’s hero today.
Share this lifesaving guide!
Source:
https://www.redcross.org/take-a-class/cpr/performing-cpr/cpr-steps
https://cpr.heart.org/en/resources/what-is-cpr
https://www.nhlbi.nih.gov/health-topics/defibrillators
https://www.verywellhealth.com/why-mouth-to-mouth-during-cpr-is-not-necessary-1298415
https://www.sca-aware.org/sca-news/aha-releases-latest-statistics-on-sudden-cardiac-arrest
AED Wall Signage Photo Credit: www.cpr-savers.com